How to Propagate Kalanchoe Flapjack
Ever wondered how to propagate Kalanchoe Flapjack? It’s simpler than you think. As an avid gardener, I’ve found that this succulent is not only stunning but also easy to multiply. Whether you’re a seasoned green thumb or just starting out, propagating Kalanchoe Flapjack can be a rewarding experience.
Steps to Propagate
First, you’ll need a healthy parent plant. Carefully cut a leaf or stem, ensuring it’s clean and dry. Let it callous over for a few days to prevent rot. Then, plant it in well-draining soil, water sparingly, and place it in a sunny spot. Before you know it, you’ll have new Kalanchoe Flapjack plants sprouting up. Happy gardening!
Choosing the Right Time for Propagation
When is the best time to propagate your plants?
This question often weighs on the minds of both novice and seasoned gardeners. Timing can make all the difference in the success of your propagation efforts.
Key Considerations for Timing:
- Season: Spring is generally the ideal time for propagation. As temperatures rise and daylight increases, plants naturally enter a growth phase.
- Plant Type: Different plants have unique growth cycles. Research the specific needs of your parent plant.
- Weather Conditions: Ensure that the weather is stable and not too extreme. Avoid propagating during very hot or cold spells.
For example, I once attempted to propagate a succulent in the middle of winter. The results were less than stellar.
Signs of Readiness:
- Look for healthy, vigorous growth in the parent plant.
- Ensure that the plant is free from pests and diseases.
By choosing the right time, you set the stage for successful propagation.
If you’re looking for a comprehensive guide on propagation techniques, check out our step-by-step guide to grow Kalanchoe from leaf cuttings. Additionally, for those interested in specific succulent types, our detailed guide on how to propagate Kalanchoe Beharensis Fang can be incredibly helpful.
Required Tools and Materials
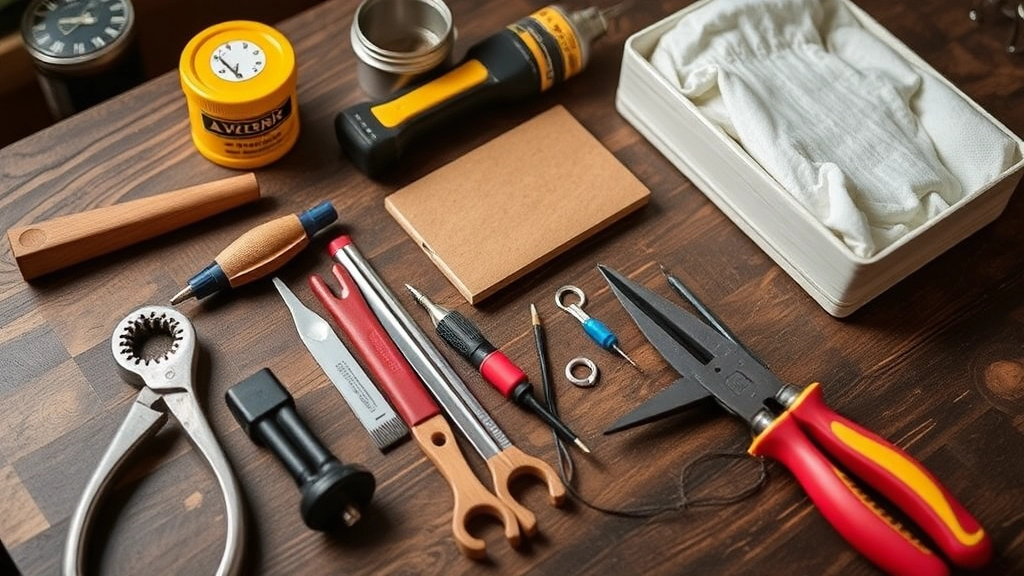
So, you’re ready to dive into plant propagation? But wait—do you have everything you need? Getting your hands on the right tools and materials can make all the difference.
Essential Tools
- Sharp Scissors or Pruning Shears: For clean cuts, you want something sharp. Dull tools can damage your plants.
- Clean Containers: You’ll need pots or trays for your cuttings. Make sure they have drainage holes to avoid waterlogging.
- Rooting Hormone (Optional): This can give your cuttings a boost, helping them to root faster. It’s not essential, but it can be handy.
- Watering Can or Spray Bottle: Keep your cuttings moist but not soggy. A spray bottle can help with gentle misting.
Required Materials
- Potting Mix: A well-draining mix is key. Look for something designed for propagation or make your own by mixing compost with perlite.
- Plastic Bags or Cling Film: To create a mini greenhouse effect, covering your cuttings helps retain moisture.
- Labels: If you’re propagating different types of plants, labels can help you keep track of what’s what.
- Light Source: While not a physical tool, you’ll need a bright spot for your new plants. Natural light is best, but grow lights work too.
Having these tools and materials at your fingertips will set you up for success.
Preparing the Parent Plant
Before diving into propagation, it’s crucial to ensure that your parent plant is in optimal condition. This step is often overlooked but can significantly impact the success of your cuttings.
Why is Preparing the Parent Plant Important?
- A healthy parent plant produces strong cuttings.
- Stress-free plants are more likely to root successfully.
Steps to Prepare Your Parent Plant:
- Assess the Plant’s Health:
- Look for signs of pests or disease.
- Ensure the plant is well-hydrated and has been recently fertilised.
- Prune the Parent Plant:
- Remove any dead or yellowing leaves.
- Trim back overgrown stems to encourage new growth.
- Choose the Right Time:
- Ideally, propagate during the growing season (spring or early summer).
- Avoid propagating during dormancy, as growth is minimal.
- Watering:
- Water the plant thoroughly a day before taking cuttings.
- This ensures the plant is hydrated and helps reduce stress.
- Sanitise Tools:
- Use clean, sharp scissors or pruning shears.
- Wipe them with rubbing alcohol to prevent disease transmission.
By taking these steps, you’ll set the stage for successful propagation. For more detailed tips on pruning, check out our Pruning Kalanchoe Plants: Best Tips and Techniques. Additionally, understanding how to propagate specific varieties can be helpful; see our Kalanchoe Daigremontiana Propagation Guide for step-by-step tips.
Methods of Propagation: Leaf Cuttings
When considering propagation methods, many gardeners often wonder if leaf cuttings will truly yield successful new plants.
Leaf cuttings can be a straightforward and rewarding method of propagation. This technique is particularly effective for certain types of plants, such as succulents and some houseplants.
Choosing the Right Leaves
- Select Healthy Leaves: Ensure the leaves are free from pests and diseases.
- Age Matters: Younger, mature leaves tend to root better than older ones.
Preparing the Leaf Cuttings
- Cut with Care: Use a sharp, sterile knife or scissors to take a clean cut.
- Length and Size: Aim for a cutting size of about 2-4 inches.
Rooting Hormone
- Optional but Beneficial: Dip the cut end of the leaf in rooting hormone to encourage faster root development.
Planting the Cuttings
- Soil Type: Use a well-draining potting mix. Cactus or succulent mixes work well.
- Placement: Insert the cut end into the soil, ensuring it’s stable.
Watering and Maintenance
- Initial Watering: Lightly water the soil after planting.
- Humidity: Cover with a plastic bag or place in a mini greenhouse to maintain humidity.
By following these steps, you can successfully propagate plants using leaf cuttings.
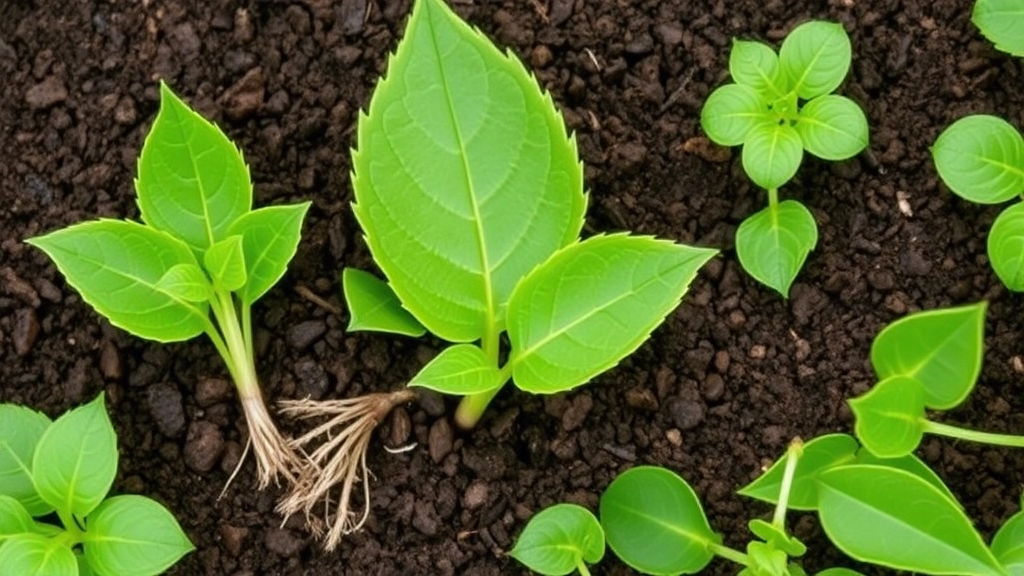
Methods of Propagation: Stem Cuttings
When considering how to propagate your plants, stem cuttings are an effective and straightforward method. Many gardeners worry about the success of this technique, but with the right approach, you can achieve impressive results.
What Are Stem Cuttings?
Stem cuttings involve taking a portion of a plant’s stem and encouraging it to develop roots. This method is popular because it allows you to clone your favourite plants easily.
Planting and Rooting the Cuttings

So, you’ve got your cuttings ready. Now what? The next step is all about planting and rooting those little green babies.
When you plant your cuttings, it’s crucial to give them the best chance to thrive. Here’s how to do it:
1. Choose the Right Medium
- Potting Soil: A well-draining potting mix is key. You can even mix in perlite or sand for extra drainage.
- Water: Make sure the soil is moist but not soggy. Too much water can lead to rot.
2. Planting the Cuttings
- Make a Hole: Use a pencil or your finger to create a hole in the soil.
- Insert the Cutting: Gently place the cutting in the hole. Make sure at least one node is buried in the soil. This is where roots will form.
- Firm the Soil: Lightly pack the soil around the cutting to hold it in place.
3. Watering
- After planting, give the cutting a good drink.
- Keep the soil consistently moist, but again, avoid overwatering.
4. Creating a Humid Environment
- Covering: You can use a plastic bag or a clear plastic container to create a mini greenhouse effect.
- Ventilation: Remember to open it occasionally to let in fresh air and prevent mould.
5. Finding the Right Spot
- Light: Place your cuttings in a bright, indirect light location. Direct sunlight can scorch them.
- Temperature: Aim for a warm environment, ideally between 18-24°C (65-75°F).
With these steps, you’re setting your cuttings up for success.
Caring for New Plants
Once you’ve successfully propagated your cuttings, the next crucial step is ensuring they thrive in their new environment.
You might be wondering, “How do I keep my new plants healthy?” or “What should I be monitoring as they grow?”
Troubleshooting Common Issues
So, you’ve taken the plunge and started propagating your plants. But what happens when things don’t go quite as planned?
Don’t worry! It’s all part of the journey.
Here are some common issues you might encounter and how to tackle them:
1. Cuttings Not Rooting
- Too Much Water: Overwatering can lead to rot.
- Solution: Ensure your cuttings are in well-draining soil and only water when the top inch feels dry. For more detailed steps, you can refer to our guide on growing Kalanchoe from cuttings.
- Insufficient Light: If your cuttings are in a dark corner, they might struggle to grow roots.
- Solution: Move them to a bright spot, but avoid direct sunlight to prevent scorching.
2. Leaves Wilting or Yellowing
- Low Humidity: Cuttings often need a humid environment to thrive.
- Solution: Use a plastic bag to create a mini-greenhouse effect or mist them occasionally.
- Nutrient Deficiency: If the soil lacks nutrients, your cuttings may show signs of distress.
- Solution: A diluted liquid fertiliser can give them a boost, but be careful not to overdo it! For more on this, check out our guide on why Kalanchoe leaves turn soft.
3. Mold or Fungal Growth
- Overwatering: This is a common culprit for mold.
- Solution: Cut back on watering and ensure good air circulation around your cuttings.
- Poor Airflow: Stagnant air can encourage fungal growth.
- Solution: Position your cuttings in a well-ventilated area.
4. Pests Invading
- Aphids or Spider Mites: These little critters can wreak havoc on your new plants.
- Solution: A gentle spray of neem oil or insecticidal soap can help keep them at bay.
- Check Regularly: Make it a habit to inspect your cuttings for any signs of pests.
FAQs on How to Propagate Kalanchoe Flapjack
What tools do I need to propagate Kalanchoe Flapjack?
To propagate Kalanchoe Flapjack, you will need sharp scissors or pruning shears, clean containers with drainage holes, a watering can or spray bottle, and optionally, rooting hormone. These tools will help you make clean cuts and maintain the right moisture levels for your cuttings.
What materials are essential for propagating Kalanchoe Flapjack?
You will need a well-draining potting mix, plastic bags or cling film to retain moisture, labels for organization, and a good light source. These materials will help create an optimal environment for your cuttings to root and grow.
How do I choose the right leaves for propagation?
Select healthy, pest-free leaves that are young and mature. These characteristics increase the chances of successful rooting.
How should I prepare the leaf cuttings?
Use a sharp, sterile knife or scissors to take a clean cut. Aim for a cutting size of about 2-4 inches to increase the likelihood of successful propagation.
Is rooting hormone necessary for propagating Kalanchoe Flapjack?
Using rooting hormone is optional but beneficial. Dipping the cut end of the leaf in rooting hormone can encourage faster root development.
What type of soil should I use for planting the cuttings?
A well-draining potting mix is essential. Cactus or succulent mixes work well for Kalanchoe Flapjack cuttings.
How should I water and maintain the cuttings?
Lightly water the soil after planting and maintain humidity by covering the cuttings with a plastic bag or placing them in a mini greenhouse. Be sure to ventilate occasionally to prevent mold.
What is the best environment for rooting Kalanchoe Flapjack cuttings?
Place your cuttings in a bright, indirect light location. Maintain a warm environment, ideally between 18-24°C (65-75°F), to encourage rooting and growth.
How do I create a humid environment for the cuttings?
Cover the cuttings with a plastic bag or a clear plastic container to create a mini greenhouse effect. Open it occasionally to let in fresh air and prevent mold.
How do I ensure the cuttings are stable in the soil?
After inserting the cuttings into the soil, lightly pack the soil around them to hold them in place. Ensure at least one node is buried in the soil, as this is where roots will form.
Following these guidelines will help you successfully propagate Kalanchoe Flapjack plants.
References
-
Propagating Plants From Leaf Cuttings
-
How to Propagate Houseplants
-
Propagation by Cuttings